Chemistry
Experiment A-6
Separation by Solubility
We have been developing a set of skills fundamental to understanding chemical substances. But perhaps more importantly, our investigations simultaneously provide a window into how the mind works: how we come to understand what is true about the world.
- In Experiment A-1 we began practicing careful observations as distinct from interpretations.
- In Experiments A-2 and A-5 we studied classifying materials by the properties using various classification systems.
- In Experiments A-3 and A-4 we began to use tools to extend our senses and make measurements.
- In Experiment A-5 we began to separate and analyze substances.
While we should continue to distinguish reliable observations from riskier interpretations, life will require us to make interpretations based on our observations. So will be wise to keep track of which information is reliable evidence and which is more speculative interpretation and therefore ripe for revision. (Alas, many people get confused, rejecting or ignoring hard evidence in order to maintain flawed interpretations they prefer to be true!)
In this experiment we will continue to observe and analyze substances by adding to our repertoire of properties. While these properties may at first seem mundane and trivial, they will later become more important as the evidence for understanding the essence of nature on the atomic and molecular scale.
- We have previous used appearance. Color, texture, sheen, shape and such will continue to be of value.
- As noticed in Experiment A-4, substances typically have different densities.
- Solubility is another very useful property: A material might be soluble in hot water but not cold water. Some materials may dissolve in a petroleum based solvent (such as paint thinner or gasoline), but not in a different solvent such as water.
Materials
- safety goggles
- a safety observer/helper in case anything goes wrong
- plain metal can lid (5 cm to 15 cm (2 to 6 inches) in diameter (as a disposable support for uniform heating)
- stove or other heating device (if you must use a microwave oven, substitute for the can lid a non-metal holder)
- water
- cooking oil
- several cm3 (teaspoon) each of
- pure sand
- sugar
- salt
- chocolate
- plant material such as lettuce, tea, a spice or other leaves.
Experiment
In this experiment you will identify properties of several chemicals then use those properties to analyze a mixture of them.
Part I: Property Changes Due to Heating
- Note and record the initial properties of each of the five solids: sand, sugar, salt, chocolate and leaf.
- Place tiny samples (a few granules) of each of the five substances as far apart as possible on the plain metal lid. (Tiny amounts are safer to experiment with in case of an unexpected fire, explosion, or release of poisonous fumes. In this case larger amounts change more slowly and sometimes mix with the other substances and so confusing the results. While sometimes using more substance gives better results, this situation works better with tiny amounts!) Think ahead! Be prepared for any emergency. Have ready something such as baking soda or a fire extinguisher to extinguish a LARGE fire. If a tiny fire occurs, just let the tiny amount of material be consumed by burning. Such chemical reactions have to stop when they run out of needed ingredients!
- Protect your eyes by wearing goggles. While no accident is anticipated here, whenever heating a substance there is a possibility of an accident which could destroy your sight. Unlike other body tissue that regenerates after injury, eyes don't grow back! Don't assume that because you've previously been lucky, that you will not face an accident today. (The author recalls a meeting where Neils Bartlett, who discovered the first compound of an
inert gas,
long thought totally impossible, described how he would have also received credit for discovering a second such compound had not others received the credit while he was in hospital as a result of a sample of the second compound exploding! Don't pull a Bartlett here!) With goggles on, slowly heat the center of the metal lid, noting all changes. Since the substances will gradually get hotter, the first changes probably occur at a lower temperature than those occurring later. Because metals are good conductors of heat, the metal lid will conduct the heat so the samples have about the same temperature at any particular moment.
- In your journal record both a description of each change observed and some indication of the intensity of temperature needed to cause the change. A substance may change color, melt, boil, or sublimate (proceed directly from solid to vapor), burn, explode,
pop,
or not change at all.
- Let the lid cool before touching or moving it. Clean and save the can lid for later experiments.
Part II: Solubility's
Solubility tests generally have less hazards! If you splash a solution into your eye, you should consider what the materials are. If there is any risk of eye damage, IMMEDIATELY begin to rinse the eye with comfortable temperature, flowing water. Standard procedure specifies rinsing for 15 minutes followed by medical attention. A stinging sensation is a clear indication that rinsing is needed. But some harmful chemicals will deaden the nerves so lack of any stinging does not assure that there is no need for rinsing. Unless you know a splash is harmless, rinse!
If you choose to test solubility with a flammable solvent, keep away from any possible ignition source. (Stove pilot lights, motors such as in refrigerators, and electrical switches are potential ignition sources.) Since vapors can both build up and flow inside a room, it may be best to work with flammable solvents outside when and where a breeze would prevent the accumulation of fumes. Whenever working with flammable materials have a fire extinguisher handy, be sure you have an escape route and alternate escape route, and have a safety assistant/helper available in case of emergency. Remember if you or your clothes are ever on fire, STOP, DROP, and ROLL to reduce and hopefully extinguish the flame.
- Place tiny samples (a few granules) of each of the five solids: sand, sugar, salt, chocolate and leaf in separate containers of roughly 10 cm3 cold water. Shake for a minute or so then observe whether the samples of solid are still visible. If none of the solid remains, consider that the solid dissolved in the solvent to form a solution. Classify each substance as very soluble, slightly soluble, or insoluble. Again tiny amounts are required. (Larger amounts of even very soluble substances often seem to be insoluble! Don't fake yourself out by using too much!) Generally water mixtures and solutions may be discarded down a sewer unless the solute (the material dissolved in the solvent) is poisonous.
- Repeat the solubility tests with hot water. Be careful not to scald yourself! It may be better to stir rather than shake the mixtures.
- Before starting, determine how to dispose of the next solvent. Flammable solvents should NEVER be discarded down a sewer! While highly flammable petroleum solvents (such as paint thinner and gasoline) are good solvents, they are difficult to dispose and have other problems. Gasoline contains benzene, a carcinogen (potentially leads to liver cancer). So you should try to avoid breathing gasoline vapors and absorption though skin. For this experiment, cooking oil provides similar results and can be disposed by packaging and placing in the garbage. Repeat the solubility tests with cooking oil. Because of the viscosity of the oil, you may need to stir rather than shake to encourage solubility.
- Construct a table showing the solubility of each solid in each solvent.
Part III: Separating and Analyzing an Unknown
Analyzing the composition of unknown mixtures is a typical task for many chemists. But it is also a way to evaluate if you've gained valuable skills and understanding. In a classroom the instructor or an assistant would assemble an unknown for student's to analyze. But we'll need to be more creative to gain as good an experience.
Obtain and label several identical containers (perhaps as simple as folded sheets of paper). Weigh out samples (not the same sized) of the solids tested earlier, combine then in pairs and mix. Record the composition of each but don't calculate the composition (yet). Then mask the labels so you can't identify which mixture is which. Shuffle the unknown samples and draw out one (at a time) to analyze.
 Open the unknown and closely inspect its contents to try to determine the components visually. If you are unsure, for example if a granule is sand or salt, test a very small amount for one of the properties which is distinguishing.
Choose an appropriate procedure that should be capable of separating the two components. The goal is to separate the mixture into its two components and find the percent composition of each. If one component is soluble in a solvent and the other is not, then dissolving and filtering should be a useful technique. If one component melts at a moderately low temperature while the other does not, then develop a procedure that would separate the materials while warm.
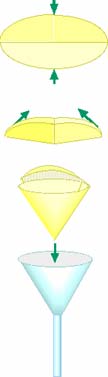
Filtering Technique: The traditional technique for separating a solid from a liquid is filtering. Round pieces of specialized porous paper is manufactured for filtering. Paper towels may be cut into round circles or portions of purchased coffee filters may be used. The rounds are folded in half then folded in half a second time at right angles to the first fold. If one SIDE of this is opened, a cone is formed that will fit inside a funnel. When the mixture is poured into the filter, the solid caught in the filter is known as the residue and the liquid which passes through the filter is known as the filtrate. A substance dissolved in the filtrate can be retrieved by evaporating the filtrate. (Take appropriate precautions during evaporation.) Weigh the separated solids, determine the percent composition, THEN calculate and compare the original composition to determine how successfully you have analyzed the composition.
If you need course credit, use your observations recorded in your journal to construct a formal report.
Postscript
It is too early to interpret the kinds of polar and non-polar forces required at the molecular level to explain what was observed in this experiment. We will first need to understand the observational evidence which seems to require the existence of atoms and molecules before we can develop a sound appreciation for the structures and behaviors of those molecules.&nbs; But that is where this study is headed.